Quantcast
Channel: HowTo – data-protector.org
Viewing all 53 articles
Browse latest View live

EADR and Tape Block Size

$
0
0

In früheren Artikeln habe ich bereits ausführlich über die in Data Protector kostenlos integrierte Bare Metal Recovery Funktion – Enhanced Automated Disaster Recovery (EADR) geschrieben – siehe auch http://www.data-protector.org/wordpress/?s=eadr. Für die Wiederherstellung des Cell Servers, siehe Link, hatte ich auch immer auf die Wichtigkeit der Block Size von 64K für die Sicherung des Cell Servers hingewiesen. Mit Data Protector 9.0X und Windows 2008 / Windows 2012 besteht diese Einschränkung nicht mehr; in den Handbüchern wird diese Einschränkung auch nicht mehr gelistet. Sebastian Köhler (siehe http://www.syncer.de) hat EADR für den Cell Server mit einer höheren Block Size für SAS / FC Libraries, StoreOnce und Filelibrary erfolgreich getestet. Es besteht somit keine Notwendigkeit mehr separate Laufwerke für die Sicherung des Cell Servers anzulegen; die Administration wird somit wieder ein Schritt einfacher.

Durch einen weiteren Hinweis von Sebastian kann für den Befehl omniiso unter Data Protector 9.0X jetzt auch wieder der Parameter -anyobj verwendet werden – Details hierzu können auch in dem ursprünglichen Artikel http://www.data-protector.org/wordpress/2014/04/eadr-cell-server-dp-8-1x-windows-2012-r2/ nachgelesen werden.

This Article is also available in English.


Five Minutes to run your Data Protector Installation Server on Linux

$
0
0

Für die Installation der Data Protector Software auf Linux basierenden Betriebssystemen und HP-UX wird, genau wie unter Windows, ein Installation Server benötigt. Erst mit einem Installation Server ist es möglich automatisiert neue Clients über die GUI zu installieren und bestehende Clients zu aktualisieren (Push-Installation). Ich verwende hierfür immer eine virtuelle Maschine. Eine Basisinstallation ohne graphische Benutzeroberfläche ist völlig ausreichend; unterstützt wird der Linux Installation Server auf RedHat, CentOS, Oracle Enterprise Linux und SUSE Linux Enterprise Server (Details zu den Versionen stehen in der Matrix: Platform_Integrtn_SptMtx.pdf). Mit der nachfolgenden Anleitung zeige ich, welche Schritte notwendig sind einen Data Protector Linux Installation Server zu installieren oder auf eine neuere Version zu aktualisieren. Dies schließt das Entfernen einer älteren “Major Version” vom Data Protector auf dem Installation Server ein. Das Abarbeiten der Schritte dauert maximal fünf Minuten.

Entfernen einer älteren Data Protector Version:

cp /opt/omni/.omnirc /tmp/.omnirc.sav
rpm -qa | grep -i ob2 > /tmp/removeOB2
for PACKAGE in `cat /tmp/removeOB2`; do rpm -e $PACKAGE --nodeps --noscripts; done;
cp /etc/services /tmp/services.bak
cat /etc/services | sed -e "s/omni/\#omni/" > /tmp/services.new
cp /tmp/services.new /etc/services
rm /etc/xinetd.d/omni 
rm -r /etc/opt/omni
rm -r /opt/omni
rm -r /var/opt/omni
rm /tmp/removeOB2
rm /tmp/services.new

Kommentar: Dies ist nicht der empfohlene Weg zum Entfernen, jedoch der schnellste Weg. Bitte beachte, dass unter Umständen für Data Protector “Site Specific Patches” oder andere “Hotfixes” nicht der String “OB2″ in der Paketbeschreibung genutzt wurde.

Installation der neuen Data Protector Version (nur Installation Server):

mkdir /dpinstall                                           (*)
mkdir /dpinstall/dp9
mkdir /dpinstall/dp9pb
copy ISO file to /dpinstall                                (**) 
copy patch bundle file to /dpinstall                       (***)
mount -o loop /dpinstall/TD586-15021.iso /dpinstall/dp9
/dpinstall/dp9/LOCAL_INSTALL/omnisetup.sh -IS
umount /dpinstall/dp9
tar -xvf DPLNXBDL_00902.tar -C /dpinstall/dp9pb/
cd /dpinstall/dp9pb
./omnisetup.sh -bundleadd b902
cd /
rm -r /dpinstall
cp /tmp/.omnirc.sav /opt/omni/.omnirc                      (****)

* oder einem Verzeichnis mit ausreichend freiem Speicher
** zum Beispiel: TD586-15021.iso – Data Protector 9.00 Linux – kopieren mit winscp
*** zum Beispiel: DPLNXBDL_00902.tar – Data Protector 9.02 Linux – kopieren mit winscp
**** sofern die Datei vorhanden ist – siehe Entfernen Data Protector

In dem Beispiel wird davon ausgegangen, dass auch ein Patch Bundle installiert werden muss, ansonsten wären die Schritte 3, 5, 9, 10 und 11 nicht erforderlich. Nach der Installation sollte der Inhalt der .omnirc Datei geprüft werden; mindestens die Varaiable OB2_SSH_ENABLED=1 wird in /opt/omni/.omnirc benötigt, da sonst eine Verteilung der Client Software über die Data Protector GUI nicht möglich ist. Falls die Datei noch nicht existiert, so kann sie aus der Vorlage erstellt werden – cp /opt/omni/.omnirc.TMPL /opt/omni/.omnirc. Wenn zusätzliche Updates verfügbar sind, so sind diese auf den Server zu kopieren. Das Entpacken von zusätzlichen Updates wird mit dem Kommando tar durchgeführt. Es werden das RPM Paket und eine Text Datei generiert. In der Text Datei steht das Kommando zum Installieren des Patches. Es ist zu beachten, dass die Patches in einer bestimmten Reihenfolge zu installieren sind, Details: http://www.data-protector.org/wordpress/2013/06/basics-installation-order-patches/.

Registrieren des Installation Server in der Data Protector Zelle:

omnicc -export_is <installation server>                    (*)
omnicc -import_is <installation server>                    (**) 

* Der Schritt ist nur notwendig, wenn der Server bereits als Installation Server genutzt wurde
** Für “installation server” ist der Name des Servers (FQDN) zu verwenden

Wenn dieser Installation Server bereits früher für die Verteilung der Client Software genutzt wurde, so kann er jetzt direkt für ein Upgrade der bestehenden Clients über die Data Protector GUI genutzt werden. Falls dies der erste Linux Installation Server in der Umgebung ist, so ist zusätzlich die SSH basierende Anmeldung zu konfigurieren.

Erstellen des public/private rsa key pair:

ssh-keygen                                                 (*)
ssh <client - short name>                                  (**) 
ssh <client - FQDN name>                                   (**) 
ssh <client - IP address>                                  (**) 
Add public key                                             (***)

* Beantworten der Fragen, danach wird das “Key Pair” generiert
** Der Anmeldevorgang kann abgebrochen werden, sobald der Host-Key des Clients akzeptiert wurde
*** Mit ssh am zu installierenden Client anmelden, es muss der Public Key des Installation Servers (cat /root/.ssh/id_rsa.pub) der Datei /root/.ssh/authorized_keys hinzugefügt werden

Es wird davon ausgegangen, dass bei der Beantwortung der Fragen des Kommandos ssh-keygen die Standardwerte übernommen werden. Es wird ferner davon ausgegangen, dass für die SSH Konfiguration ebenfalls die Standardwerte und Standardpfade genutzt wurden.

This Article is also available in English.

Migrate DP 8.XX to DP 8.XX using new hardware or different MS Windows operating system

$
0
0

The migration of the internal database to new hardware or to a new Microsoft Windows operating system was no big deal in the past and before the release of Data Protector 8.xx. With the introduction of PostgreSQL as the new internal database this has been changed and several steps are necessary in order to perform a successful migration. The following is a guide that enables you doing a migration to new hardware, or, for example, the move from Windows 2008 R2 to Windows 2012 R2. For a successful migration, some requirements must be met; furthermore the migration is dependent on various conditions. For the listed instructions no guarantee can be given and it is recommended to perform the migration with an HP partner. For the elaborate article I would be glad to receive some donations.

Prerequisites and conditions:

  • The command omnidbcheck -extended shows no errors. For Data Protector version 8.10 it might be necessary to apply hotfix QCCR2A50694 first. Successful omnidbcheck:
    C:\>omnidbcheck -extended
    Check Level             Mode                    Status
    ===========================================================
    Database connection     -connection             OK
    Schema consistency      -schema_consistency     OK
    Datafiles consistency   -verify_db_files        OK
    Database consistency    -database_consistency   OK
    Media consistency       -media_consistency      OK
    SIBF(readability)       -sibf                   OK
    DCBF(presence and size) -bf                     OK
    OMNIDC(consistency)     -dc                     OK
    DONE!
  • The old “Detail Catalog Binary Files” (pre DP 8.XX) were fully migrated. The command (example) "C:\Program Files\Omniback\bin\perl.exe" omnimigrate.pl -report_old_catalog shows following output:
    Old Detail Catalog Binary Files size:
    
    DCBF (   0 files):                    0 MB
    Old filename data files:              0 MB
    Total:                                0 MB
    

    If there are still old “Binary Files” in place, you have to migrate the files first. For this purpose, the command (example) "C:\Program Files\OmniBack\bin\perl.exe" omnimigrate.pl -start_catalog_migration can be used. If for the “DCBF” 0 files are displayed, but “Old filename data files” are still displayed, this may mean that there were modifications to the old dcbf directories during or after the migration. In this special case you can copy the DCBF files from db40 to the db80 folder and run omnidbutil -remap_dcdir and omnidbutil -fixmpos.

  • The old catalog and the old “Binary Files” must be deleted after the migration from version 6, 7 to version 8 (Attention: see hint DB40). If this step has not yet been performed or if you are uncertain about the status, you can use the command (example) "C:\Program Files\Omniback\bin\perl.exe" omnimigrate.pl -remove_old_catalog to delete the old files. With a successful completion of the command, the file global will be adjusted and the support for the old catalog will be removed (SupportOldDCBF=1).
  • There must not exist any DCBF directory from a previous (pre 8.xx DP) Data Protector version. The check can be done using the GUI – Internal Database. Alternatively, export the IDB with the command omnidbutil -writedb . After the export, and the note on to copy directories, no DB40 path must displayed. By the way: the export of IDB to a connected network share is possible since v8.xx. Check export for db40 directories:
    Please make a copy of the following Internal Database directories and then press Enter to bring the Internal Database back to a fully operational state:
    
            "C:/Program Files/OmniBack/server/db80/msg"
            "C:/Program Files/OmniBack/server/db80/meta"
            "C:/Program Files/OmniBack/server/db80/dcbf/dcbf3"
            "C:/Program Files/OmniBack/server/db80/dcbf/dcbf0"
            "C:/Program Files/OmniBack/server/db80/dcbf/dcbf2"
            "C:/Program Files/OmniBack/server/db80/dcbf/dcbf1"
            "C:/Program Files/OmniBack/server/db80/dcbf/dcbf4"
    

    Note: in the example the separation of “Program Files” and “Program Data” has not yet been performed, see also following items.

  • Note db40: If there are any DCBF files in folder db40 left after migration from pre DP 8.XX to DP 8.XX, it might have different causes. The migration of DCBF files is absolutely necessary before removing the old catalog. To check for old “Binary Files”, save select medium_name, dcbf_directory, dcbf_version from dp_dcbf_info i, dp_dcbf_directory d where i.dcbf_directory_seq_id = d.dp_numkey order by dcbf_version; into file dcbf_version.sql and execute the command omnidbutil –run_script dcbf_version.sql –detail. The output displays the media ID, folder and DCBF version. A media with -1 has not been migrated so far and can be migrated with the command omnimm -upgrade_dcbf . If for the DCBF folders (db40 path – see export IDB) a back-slash, instead of a forward-slash is displayed, you are required to export the IDB (omnidbutil –writedb ). Modify the file dpidb.dat and change for the DCBF folders the back-slash into a forward-slash. Save the file and import the modified IDB using the command omnidbutil –readdb . With the command omnidbutil -remove_dcdir you can remove the old catalog and DCBF directories. The most important part in file dpidb.dat should look as follow (example and without separation of “Program Files” and “Programdata”):
    20cf4d3f-d425-4f01-8823-9b9e9dcfa72c	1004	C:/Program Files/OmniBack/server/db80/dcbf/dcbf3	214748364800	3	2147483648	100000	44	6964137984
    20cf4d3f-d425-4f01-8823-9b9e9dcfa72c	1001	C:/Program Files/OmniBack/server/db80/dcbf/dcbf0	214748364800	0	2147483648	100000	48	9023758336
    20cf4d3f-d425-4f01-8823-9b9e9dcfa72c	1003	C:/Program Files/OmniBack/server/db80/dcbf/dcbf2	214748364800	2	2147483648	100000	39	6941310976
    20cf4d3f-d425-4f01-8823-9b9e9dcfa72c	1002	C:/Program Files/OmniBack/server/db80/dcbf/dcbf1	214748364800	1	2147483648	100000	40	6340190208
    20cf4d3f-d425-4f01-8823-9b9e9dcfa72c	1005	C:/Program Files/OmniBack/server/db80/dcbf/dcbf4	214748364800	4	2147483648	100000	63	7780794368
    
  • The separation of “Program Files” and “Programdata” has been done in the past. If this is not the case and you plan to do the separation during the migration on the target hardware or platform, some additional steps are required. In this guide the separation was not done so far, so all steps are documented.
  • The used user names and passwords (Windows) to start the Data Protector services remain the same on the target hardware or platform. If you plan to change this and if you want to use new user and password, please refer to the article „Data Protector 8.0 Windows – change user account for DP services“ (link: https://www.data-protector.org/wordpress/2013/11/data-protector-8-0-windows-change-user-account-dp-services/).
  • The article does not apply for migrations from pre DP 8.XX versions.
  • On the source system the most current Data Protector version should be installed before the migration is done, as this will ease the migration procedure. This does apply for source systems only when the separation of “Program Files” and “Programdata” has already been done. The reason is a bug in the installation sequence when upgrading from DP 8.0X to 8.10. In this guide the same version of Data Protector is installed on the target and the upgrade will be done on the target system after the migration has been completed.
  • The name of the server and the IP addresses remain the same on the target cell server. If you are required to change that, additional steps might be necessary (export of clients beforehand, import of clients after migration, change cell server name, etc. – this will not be part of this guide).
  • The server name has to start with a leading letter and must not start with a leading number. The reason is a limitation in the included application server (JBOSS/Tomcat).
  • The internal database has not been restored in the past and there must not exist several DB80 directories (original and restored versions).
  • All names in this guide are examples.
  • After the migration, make sure you immediately start a backup for the server and the internal database. A restore of the IDB with data before the migration might not work, especially when the DCBF directories were changed during the migration. This will be possible only, when additional modification in the exported database is performed.
  • The guide does not apply to MoM environments.

Step by Step:

  • Make a backup of the IDB in case any error occurs. Using a Jukebox with some slots makes it easy to do a fast recovery. The media will be formatted and the IDB backup started. In this example the backup was done to e:\IDBBackup\01..05 and copied off the server after the IDB backup. In case you do not have sufficient local disk space, use a filelibrary configured to store the data on network share. The definition of the Jukebox and the used drive will be exported into text files. Definition Jukebox:
    E:\Program Files\OmniBack\bin>omnidownload -library IDBBackup
    NAME "IDBBackup"
    DESCRIPTION ""
    HOST servername.domain
    POLICY Jukebox
    TYPE File
    REPOSITORY
            "E:\IDBBackup\01"
            "E:\IDBBackup\02"
            "E:\IDBBackup\03"
            "E:\IDBBackup\04"
            "E:\IDBBackup\05"
    MGMTCONSOLEURL ""
    

    Definition drive:

    E:\Program Files\OmniBack\bin>omnidownload -device IDBBackup_Drive01
    NAME "IDBBackup_Drive01"
    DESCRIPTION ""
    HOST servername.domain
    POLICY Jukebox
    TYPE File
    POOL "IDBBackup"
    LIBRARY "IDBBackup"
    CONCURRENCY 10
    ENCRCAPABLE
    BUFFERS 16
    BLKSIZE 64
    RESTOREDEVICEPOOL NO
    COPYDEVICEPOOL NO
    

    In case of any errors you can use these text files to re-create the Jukebox (see help for command omniupload).

  • Stop the Data Protector scheduler using the command omnitrig -stop
  • Export the internal database with the command omnidbutil –writedb (in this guide Z:\ExportIDB is used). On request copy the directories DCBF, MSG and META off the server (i.e. Z:\Migration).
  • Stop the Data Protector services using the command omnisv -stop
  • Copy all Data Protector directories off the server (i.e. to Z:\Migration). Skip the copy for the directories DCBF, MSG and META, as this has been done in previous step. Comment: when copying the directories, all symbolic links in IDB structure will be copied as whole, so please plan for sufficient disk space on target. Once you copied the directories all relevant Data Protector parts have been backed up, however, this does not apply for any additional services installed on the source system.
  • Install the new box or operating system. Use the same server name, IP addresses, domain, groups, users and passwords. In case of changes, you need to check the configuration files step by step (see below).
  • Install HP Data Protector 8.XX to “D:\Program Files\Omniback” and “D:\Programdata\Omniback” (example). Use the same version, the same patches or hotfixes as installed on source system.
  • Configure impersonation:
    C:\Users\administrator>omniinetpasswd -inst_srv_user domain\administrator
    User 'domain\administrator' is configured to be used by Installation Server.
    
  • Stop the Data Protector services using the command omnisv -stop
  • On demand change the local security policy. This is required, if you plan to start the “Data Protector INET” service using a domain user, instead of the NT Authority\SYSTEM account. Add the user to the policies “Impersonate a client after authentication” and “Replace a process level token”.
  • Copy back the DCBF, MSG and META directories to the new path. In this guide the path D:\Programdata\OmniBack\server\db80 is used.
  • Change the DCBF directories in the file dpidb.dat (see export of IDB). This step is required only for target systems where the Data Protector directories are changed during the migration. Change of DCBF directories from:
    COPY dp_catalog_dcbf_directory (db_uuid, seq_id, dcbf_directory, maxsize, fill_sequence, min_freespace, max_dcbf_files, cur_num_of_files, cur_occupied_space) FROM stdin;
    20cf4d3f-d425-4f01-8823-9b9e9dcfa72c	1002	E:/Program Files/OmniBack/server/db80/dcbf/dcbf1	214748364800	1	2147483648	100000	47	6341406720
    20cf4d3f-d425-4f01-8823-9b9e9dcfa72c	1004	E:/Program Files/OmniBack/server/db80/dcbf/dcbf3	214748364800	3	2147483648	100000	44	6964137984
    20cf4d3f-d425-4f01-8823-9b9e9dcfa72c	1001	E:/Program Files/OmniBack/server/db80/dcbf/dcbf0	214748364800	0	2147483648	100000	48	9023758336
    20cf4d3f-d425-4f01-8823-9b9e9dcfa72c	1003	E:/Program Files/OmniBack/server/db80/dcbf/dcbf2	214748364800	2	2147483648	100000	39	6941310976
    20cf4d3f-d425-4f01-8823-9b9e9dcfa72c	1005	E:/Program Files/OmniBack/server/db80/dcbf/dcbf4	214748364800	4	2147483648	100000	63	7780794368
    

    Change of DCBF directories to:

    COPY dp_catalog_dcbf_directory (db_uuid, seq_id, dcbf_directory, maxsize, fill_sequence, min_freespace, max_dcbf_files, cur_num_of_files, cur_occupied_space) FROM stdin;
    20cf4d3f-d425-4f01-8823-9b9e9dcfa72c	1002	D:/ProgramData/OmniBack/server/db80/dcbf/dcbf1	214748364800	1	2147483648	100000	47	6341406720
    20cf4d3f-d425-4f01-8823-9b9e9dcfa72c	1004	D:/ProgramData/OmniBack/server/db80/dcbf/dcbf3	214748364800	3	2147483648	100000	44	6964137984
    20cf4d3f-d425-4f01-8823-9b9e9dcfa72c	1001	D:/ProgramData/OmniBack/server/db80/dcbf/dcbf0	214748364800	0	2147483648	100000	48	9023758336
    20cf4d3f-d425-4f01-8823-9b9e9dcfa72c	1003	D:/ProgramData/OmniBack/server/db80/dcbf/dcbf2	214748364800	2	2147483648	100000	39	6941310976
    20cf4d3f-d425-4f01-8823-9b9e9dcfa72c	1005	D:/ProgramData/OmniBack/server/db80/dcbf/dcbf4	214748364800	4	2147483648	100000	63	7780794368
    
  • Restore the during the migration copied files in D:\Programdata\OmniBack\log\server. The most important files are media.log, Ob2Event.* and the folder auditing.
  • Modify or restore the configuration files global (example: D:\ProgramData\Omniback\Config\Server\Options) and omnirc (example: D:\ProgramData\Omniback).
  • Modify or restore the files cell_info, lic.dat and installation_servers. Comment: After the upgrade to DP 8.1X all installed licenses become invalid and must be regenerated using the portal http://webware.hp.com. This requires a current support contract with HP.
  • Restore the directories: BarLists, Barschedules, consolidationlists, copylists, Datalists, dlgroups, dr, Integ, rptgroups, rptschedules, Schedules, users. For the files in folder users crosscheck the entries before overwriting.
  • Modify the files hpdp-idb-cp.cfg and idb.config in directory (example) D:\ProgramData\Omniback\Config\Server\idb. In both files modify the pathes.
    Example hpdp-idb-cp.cfg:
    [databases]
    hpdpidb = host=127.0.0.1 port=7112 dbname=hpdpidb
    
    [pgbouncer]
    service_name=hpdp-idb-cp
    listen_addr = *
    listen_port = 7113
    unix_socket_dir = /tmp
    auth_type = md5
    admin_users = hpdp
    stats_users = hpdp
    pool_mode = transaction
    server_reset_query =
    ignore_startup_parameters = application_name,extra_float_digits
    server_check_query = select 1
    server_check_delay = 10
    max_client_conn = 1200
    default_pool_size = 50
    query_wait_timeout = 10
    log_connections = 0
    log_disconnections = 0
    log_pooler_errors = 1
    logfile = D:\ProgramData\OmniBack\log\hpdp-idb-cp.log
    pidfile = D:\ProgramData\OmniBack\log\hpdp-idb-cp.pid
    auth_file = D:\ProgramData\OmniBack\config\server\idb\ulist
    

    Example idb.config:

    PGHOSTNAME='localhost';
    PGIDBNAME='hpdpidb';
    PGUSER='hpdpidb_app';
    PGPASSWORD='bWhhbnTvZ3Xxbao2Zw==';
    PGSUPERUSER='hpdp';
    PGSUPERPASSWORD='anpabZl3bnh6dGY3eQ==';
    PGMAXOPEN_CONN_NUMBER='5';
    PGDATA_PG='D:\ProgramData\OmniBack\server\db80\pg';
    PGDATA_IDB='D:\ProgramData\OmniBack\server\db80\idb';
    PGDATA_JCE='D:\ProgramData\OmniBack\server\db80\jce';
    PGOSUSER='domain\administrator';
    PGPORT='7112';
    PGCPPORT='7113';
    PGWALPATH='D:\ProgramData\OmniBack\server\db80\pg\pg_xlog_archive';
    IDB_SEC_FLAG='11';
    
  • On demand and depending on configuration it might be necessary to restore (copy back) additional files and directories. For example, when Exchange is backed up in the Environment, the folder (example) D:\ProgramData\Omniback\server\db80\vssdb\metadata60 is required.
  • Start the Data Protector services using the command omnisv -start.
  • Stop the Data Protector scheduler using the command omnitrig -stop.
  • Import the IDB using the command omnidbutil -readdb (in the guide Z:\ExportIDB is used).
  • Stop the Data Protector services using the command omnisv -stop.
  • Start the Data Protector services using the command omnisv -start.
  • Check the consistency of the internal database using the command omnidbcheck -extended. No errors must be reported.
  • For further checks start some backups and restore some data for backups done before the migration and after the migration.
  • After successful migration the used Jukebox (IDBBackup) and for the Jukebox used directories can be removed. All other directories used during the migration should be kept for at least 7 days.
  • On demand and if not already done on the source system, the upgrade to the most current Data Protector version can be started.

Reviewed: Persistent Binding Windows 2012

$
0
0

In a previous article (see https://www.data-protector.org/wordpress/2013/05/persistent-binding-hp-lto-tape-drives-windows/) I reported about “tape persistence” for Windows.
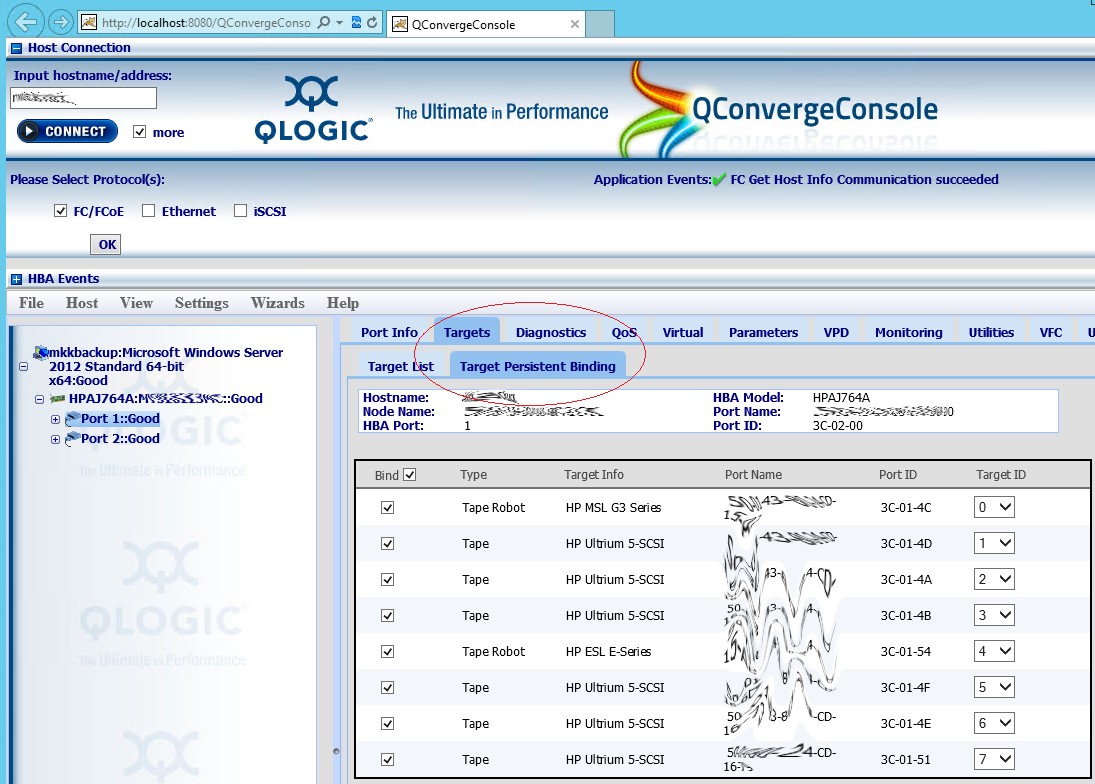
In general there is noch change to adopt this for Windows 2012 and the registry keys are the same. However, a requirement is to activate “Target Persistent Binding” for the Fibre Channel HBA. In case of a QLogic adapter you may use the tool “QConvergeConsole” (SANSurfer) for the configuration. For Emulex (HBAAnywhere) the configuration is nearly the same. After configuration and activation on the HBA, adding the registry keys and a final reboot, the tape drives and the changer can be used “persistent”. Comment: all tested with HP libraries/drives.

Example:

qlogic

Registry:

Windows Registry Editor Version 5.00

[HKEY_LOCAL_MACHINE\SYSTEM\CurrentControlSet\Services\hplto]
"AutoRun"=dword:00000000
[HKEY_LOCAL_MACHINE\SYSTEM\CurrentControlSet\Control\Tape]
"Persistence"=dword:00000001
[HKEY_LOCAL_MACHINE\SYSTEM\CurrentControlSet\Control\MChgr]
"Persistence"=dword:00000001

EADR for Cell Server – DP 8.1X on Windows 2012 R2

$
0
0

With Data Protector 8.XX the process to create disaster recovery images has been changed. Since the new version, the backup of the internal database is separated from the filesystem backup of the cell server. Hence, the “makeiso.cmd” (see https://www.data-protector.org/wordpress/2011/03/recover-cell-server-with-enhanced-automated-disaster-recovery/) is no longer working. With the separation it is necessary to provide 2 session id’s for the command omniiso; a session id from the filesystem backup and a session id from the IDB backup. As a preparation for a disaster and to automate the creation of the recovery image new batch files were created. Please see the guide below and how to implement the new scripts. The guide is valid for Data Protector version 8.10 and 8.11 only and was tested with Windows 2012 R2. For Data Protector version 8.0X the scripts will not work, as the option -anyobj is not available for the omniiso command. However, with some modifications it will be possible to run the scripts as scheduled task.

Requirements and implementation:

  • On cell server the correct version of the WAIK/ADK is installed. When Windows 2012 R2 is used, the version “ADK for Windows 8.1” is required.
  • The batch files (see download link) are copied into the Data Protector “bin” Folder (i.e: D:\Program Files\Omniback\bin).
  • The backup of the filesystems for the cell server is done using the Options “Copy Recovery Set to disk” (Filesystem Options – Advanced – Tab Other) and “Detect NTFS hardlinks”, “Backup share Information for directories” and “Use Shadow Copy” (Filesystem Options – Advanced – Tab WinFS Options).
  • The backup of the filesystems for the cell server is done using a separate backup specification (no other client) and as Post-exec script the batch file EADR_CS_FSBackup_Post.cmd (to be executed on cell server) will be inserted (Backup Specification Options – General – Post-exec).
  • The backup of the internal database from the cell server is created with no schedule (will be started by the filesystem backup) and as Post-exec script the batch file EADR_CS_IDBBackup_Post.cmd (to be executed on cell server) will be inserted (Backup Specification Options – General – Post-exec).
  • In file “EADR_CS_FSBackup_Post.cmd” the following changes must be made: variables OMNIHOME, OMNIDATA and IDBBACKUP (name of the IDB backup specification) must be modified, depending on existing environment.
  • In file “EADR_CS_IDBBackup_Post.cmd” at least the following changes must be made: variables OMNIHOME, OMNIDATA, CELLSERVER, WAIKPATH and NETWORKSHARE must be modified, depending on existing environment.
  • The batch files are already prepared with variables, so see the values as example.

Example Session Messages filesystem backup:

[Normal] From: BSM@server.domain "CS_Backup_FS"  Time: 04.04.2014 11:01:57
	Starting to execute "EADR_CS_FSBackup_Post.cmd"...


Starting EADR preparation and IDB backup

Script Environment: host='SERVER' user='DOMAIN\user'
                    script='D:\Program Files\OmniBack\bin\EADR_CS_FSBackup_Post.cmd'
                    path='D:\Program Files\OmniBack\bin\'
Backup successfully started.
Session Key: R-2014/04/04-23
[Normal] From: BSM@server.domain "CS_Backup_FS"  Time: 04.04.2014 11:01:57
	The exec script "EADR_CS_FSBackup_Post.cmd" has completed.

Example Session Messages IDB backup:

[Normal] From: BSM@server.domain "CS_Backup_IDB"  Time: 04.04.2014 12:09:50
	Starting to execute "EADR_CS_IDBBackup_Post.cmd"...


Starting the EADR preparation process

Script Environment: host='SERVER' user='DOMAIN\user'
                    script='D:\Program Files\OmniBack\bin\EADR_CS_IDBBackup_Post.cmd'
                    path='D:\Program Files\OmniBack\bin\'
Creating the ISO image ...
[Normal] From: omniiso@server.domain "omniiso"  Time: 04.04.2014 12:09:55
	Creating the Disaster Recovery ISO image file. This may take a few minutes...

[Normal] From: omniiso@server.domain "omniiso"  Time: 04.04.2014 12:09:55
	Initializing MiniOS directory structure.

[Normal] From: omniiso@server.domain "omniiso"  Time: 04.04.2014 12:09:55
	Mounting MiniOS image.

[Normal] From: omniiso@server.domain "omniiso"  Time: 04.04.2014 12:10:00
	Inserting Recovery Info file into the MiniOS image file.

[Normal] From: omniiso@server.domain "omniiso"  Time: 04.04.2014 12:10:00
	Inserting hardware information file into the MiniOS image file.

[Normal] From: omniiso@server.domain "omniiso"  Time: 04.04.2014 12:10:00
	Inserting network information file into the MiniOS image file.

[Normal] From: omniiso@server.domain "omniiso"  Time: 04.04.2014 12:10:00
	Inserting ASR BCD file into the MiniOS image file.

[Normal] From: omniiso@server.domain "omniiso"  Time: 04.04.2014 12:10:00
	Copying MiniOS system files to the image file.

[Normal] From: omniiso@server.domain "omniiso"  Time: 04.04.2014 12:10:00
	Copying DRM binaries to the image file.

[Normal] From: omniiso@server.domain "omniiso"  Time: 04.04.2014 12:10:00
	Copying DRM configuration directory to the image file.

[Normal] From: omniiso@server.domain "omniiso"  Time: 04.04.2014 12:10:00
	Copying backup application depot directory to the image file.

[Normal] From: omniiso@server.domain "omniiso"  Time: 04.04.2014 12:10:00
	Storing phase 0 log file into the Recovery Set archive.

[Normal] From: omniiso@server.domain "omniiso"  Time: 04.04.2014 12:10:00
	Configuring vendor specific system images.

[Normal] From: omniiso@server.domain "omniiso"  Time: 04.04.2014 12:10:00
	Creating the MiniOS image startup file.

[Normal] From: omniiso@server.domain "omniiso"  Time: 04.04.2014 12:10:00
	Installing additional MiniOS packages.

[Normal] From: omniiso@server.domain "omniiso"  Time: 04.04.2014 12:10:17
	Installing additional MiniOS packages.

[Normal] From: omniiso@server.domain "omniiso"  Time: 04.04.2014 12:11:04
	Installing additional MiniOS packages.

[Normal] From: omniiso@server.domain "omniiso"  Time: 04.04.2014 12:11:09
	Installing additional MiniOS packages.

[Normal] From: omniiso@server.domain "omniiso"  Time: 04.04.2014 12:11:15
	Installing additional MiniOS packages.

[Normal] From: omniiso@server.domain "omniiso"  Time: 04.04.2014 12:11:20
	Installing additional MiniOS packages.

[Normal] From: omniiso@server.domain "omniiso"  Time: 04.04.2014 12:11:25
	Installing additional MiniOS packages.

[Normal] From: omniiso@server.domain "omniiso"  Time: 04.04.2014 12:11:32
	Installing additional MiniOS packages.

[Normal] From: omniiso@server.domain "omniiso"  Time: 04.04.2014 12:11:39
	Cleaning up MiniOS image, preparing it for usage.

[Normal] From: omniiso@server.domain "omniiso"  Time: 04.04.2014 12:11:39
	Injecting driver files into the MiniOS image.

[Normal] From: omniiso@server.domain "omniiso"  Time: 04.04.2014 12:11:56
	Initializing MiniOS scratch space.

[Normal] From: omniiso@server.domain "omniiso"  Time: 04.04.2014 12:11:57
	Dismounting/Committing MiniOS image.

[Normal] From: omniiso@server.domain "omniiso"  Time: 04.04.2014 12:12:18
	Writing CD-ROM ISO image to the target location.

[Normal] From: omniiso@server.domain "omniiso"  Time: 04.04.2014 12:12:18
	Successfully created the Disaster Recovery ISO image.

Saving information about used media ...
Copying generated ISO file and information about used media to network share ...
        1 file(s) copied.
        1 file(s) copied.
        1 file(s) copied.
Finished
[Normal] From: BSM@server.domain "CS_Backup_IDB"  Time: 04.04.2014 12:12:26
	The exec script "EADR_CS_IDBBackup_Post.cmd" has completed.

Distribute omnirc File

$
0
0

You know Data Protector? So you know that the modification of parameter for Data Protector is done in file global and in file omnirc. The file global is maintained on the Cell Server directly, but the file omnirc (Linux/HP-UX: /opt/omni, Windows 2008 C:\programdata\omniback) has to be maintained on each client individually. The Data Protector admin often maintains one version on the Cell Server and distribute the modified file manually to each individual client. That’s the case, because no distribution mechanism exist for the file omnirc, at least in the past.

With Data Protector 8.11 there is a new way to modify omnirc values for the clients, using the command util_cmd.

util_cmd -setomnirc   []
util_cmd –getomnirc  

name      – the name of the environment variable written in DP omnirc file.
hostname  – the name of the host on which to modify omnirc or get omnirc value from
value     – the value of environment variable to be added or modified in omnirc file.

If a value is omitted, the variable will be removed from omnirc file. If file omnirc does no exist, a new file will be generated on client. If a variable already exists, its value will be changed in-place, otherwise the new variable will be appended to omnirc file. The command can be used too for reading variables and values from clients.

Example to be used to further automate distribution of omnirc parameter (read non existing variable, set variable, read existing variable):

C:\Program Files\OmniBack\bin>util_cmd.exe -getomnirc w2012r2dp.localdomain OB2IPCKEEPALIVE
*RETVAL*0

C:\Program Files\OmniBack\bin>util_cmd.exe -setomnirc w2012r2dp.localdomain OB2IPCKEEPALIVE 1
*RETVAL*0

C:\Program Files\OmniBack\bin>util_cmd.exe -getomnirc w2012r2dp.localdomain OB2IPCKEEPALIVE
1
*RETVAL*0

New Video Tutorial – HP Backup Navigator

New Video Tutorial – DP Part 1 – Intro, Architecture, Licensing


EADR and Tape Block Size

$
0
0

In older articles I often wrote about Bare Metal Recovery, a feature included in Data Protector without any additional costs and called Enhanced Automated Disaster Recovery (EADR) – see https://www.data-protector.org/wordpress/?s=eadr. To recover the Cell Server (see link) I always told to use tape devices with a block size of 64K. With Data Protector 9.0X and Windows 2008 / Windows 2012 this is no longer required, the limitation is no longer listed in the Data Protector handbooks. Sebastian Köhler (see http://www.syncer.de) has tested EADR for a Cell Server with a higher block size. He made the tests with SAS / FC libraries, StoreOnce and file libraries. So, you no longer need separate tape drives to backup your Cell Server, this makes the administration more easier.

And an additional comment from Sebastian, the parameter -anyobj for the command omniiso is back and available with Data Protector 9.0X. For additional details, please review the article https://www.data-protector.org/wordpress/2014/04/eadr-cell-server-dp-8-1x-windows-2012-r2/.

Five Minutes to run your Data Protector Installation Server on Linux

$
0
0

In order to install the Data Protector client software on Linux based systems and on HP-UX, you need to have a server with the installation server package installed. With an installation server you are able to distribute the software onto new clients or to upgrade existing clients (push installation). I use a virtual machine with a basic installation and no graphical interface in these cases. The installation server is supported on RedHat, CentOS, Oracle Enterprise Linux and SUSE Linux Enterprise Server (details and version information can be found in matrix: Platform_Integrtn_SptMtx.pdf). With the documentation below I show you how to install or upgrade the Data Protector Linux Installation Server. This includes the removal of an older major version and will not take more than five minutes in total.

Remove older Data Protector version:

cp /opt/omni/.omnirc /tmp/.omnirc.sav
rpm -qa | grep -i ob2 > /tmp/removeOB2
for PACKAGE in `cat /tmp/removeOB2`; do rpm -e $PACKAGE --nodeps --noscripts; done;
cp /etc/services /tmp/services.bak
cat /etc/services | sed -e "s/omni/\#omni/" > /tmp/services.new
cp /tmp/services.new /etc/services
rm /etc/xinetd.d/omni
rm -r /etc/opt/omni
rm -r /opt/omni
rm -r /var/opt/omni
rm /tmp/removeOB2
rm /tmp/services.new

Comment: This is not the recommended way to uninstall Data Protector, but the fastest method. Keep in mind that Data Protector site specific patches or other hotfixes may not have been installed with the “OB2” string in the package description.

Install new Data Protector version (Installation Server only):

mkdir /dpinstall                                           (*)
mkdir /dpinstall/dp9
mkdir /dpinstall/dp9pb
copy ISO file to /dpinstall                                (**)
copy patch bundle file to /dpinstall                       (***)
mount -o loop /dpinstall/TD586-15021.iso /dpinstall/dp9
/dpinstall/dp9/LOCAL_INSTALL/omnisetup.sh -IS
umount /dpinstall/dp9
tar -xvf DPLNXBDL_00902.tar -C /dpinstall/dp9pb/
cd /dpinstall/dp9pb
./omnisetup.sh -bundleadd b902
cd /
rm -r /dpinstall
cp /tmp/.omnirc.sav /opt/omni/.omnirc                      (****)

* or any other folder with sufficient space
** e.g. TD586-15021.iso – Data Protector 9.00 Linux – use winscp to copy the file
*** e.g. DPLNXBDL_00902.tar – Data Protector 9.02 Linux – use winscp to copy the file
**** if file exists – see remove older version of Data Protector

In the example it is assumed that a patch bundle needs to be installed in addition. If no patch bundle is available the steps 3, 5, 9, 10 and 11 are not required. After the installation it is recommend to check the content of the file .omnirc; at least the variable OB2_SSH_ENABLED=1 in file /opt/omni/.omnirc is required in order to distribute new clients using Data Protector GUI. If the file does not exist you can create it from template – cp /opt/omni/.omnirc.TMPL /opt/omni/.omnirc. If additional updates are available copy the patches onto the server and decompress using command tar. A rpm package and text file will be generated. Within the text files the command to install the patch can be found. Please keep in mind, Data Protector patches will be installed using a special order; for details see https://www.data-protector.org/wordpress/2013/06/basics-installation-order-patches/.

Register Installation Server in Data Protector Cell:

omnicc -export_is                     (*)
omnicc -import_is                     (**)

* This step is required only if the server was already an installation server
** Use the name of the server (FQDN) for “installation server”

If this installation server was already used in the past to install the Data Protector client software, you now can use it to upgrade your existing client using the Data Protector GUI. If this installation server is your first installation server you need to configure SSH based authentication first.

Create public/private rsa key pair:

ssh-keygen                                                 (*)
ssh                                   (**)
ssh                                    (**)
ssh                                   (**)
Add public key                                             (***)

* Answer the questions to generate the “key pair”
** You can cancel the login once you accepted the host key for the client
*** Use ssh to login into the new client and add the public key from the installation server (cat /root/.ssh/id_rsa.pub) into the file /root/.ssh/authorized_keys

It is assumed that defaults will be used when using the command ssh-keygen. Furthermore it is assumed that all defaults were used for the SSH configuration and paths.

TESTED: PowerOn&Run and Live Migrate from 3PAR Snapshots or SmartCache

$
0
0

With Data Protector 9.04 the new features PowerOn & Run and Live Migrate from 3PAR snapshots or SmartCache were introduced. This feature allows to power on and test virtual machines (VMware), backed up using the VE integration. Recently I had the opportunity to implement this feature in a proof of concept and to present the solution to the customer. I have also been able to talk with some partners and customers meanwhile and bottom line is: a successful implementation! Some discussions around these features lead to the question whether Veeam is still required as supplementary backup solution, as Data Protector provides one more time an another attractive recovery option for virtual machines in Enterprise environments.

In the mentioned PoC I had performed the backup of multiple virtual machines into the SmartCache. In addition I backed up some machines using Zero Downtime Backup and implemented it into the customers backup and recovery strategy. PowerOn and Migrate worked perfectly when I used 3PAR snapshots and the SmartCache and I encourage all customers to test these new Data Protector features. If no 3PAR in place, no problem, you can perform the test with the SmartCache as I did in addition.

Speaking perfectly, two problems raised up. In one case, an error message when turning on the virtual machine was displayed: “A question needs to be answered before power on can be completed” and as a result “Error powering on”. In the second case, an error message came: “Share presentation failed” and as a result “Power On Virtual Machine failed”. In both cases, however, Data Protector has shown only a consequence of failure of another cause. Before anyone comes across the same error, follow the explanation of the cause.

“A question needs to be answered before power on can be completed”

Using Virtual Center, the unanswered question was displayed with the comment “Diese virtuelle Maschine wurde möglicherweise verschoben oder kopiert…” (German message). In debug files following was seen:

[ 99] 2015-08-19 14:23:46.463 ("/integ/vep/vepa/Plugins/Vmware/VmwareHelpers/ConfigUtil.cpp $Rev: 49146 $ $Date:: ":293)
[ 99] ===>> (6) ConfigUtil::answerQuestion {
[ 99]
[ 20] [ConfigUtil::answerQuestion] waiting for different question
_vmx1
Diese virtuelle Maschine wurde möglicherweise verschoben oder kopiert. Um bestimmte Verwaltungs- und Netzwerkfunktionen konfigurieren zu können, muss VMware ESX wissen, ob diese virtuelle Maschine verschoben oder kopiert wurde. Wenn Sie es nicht wissen, antworten Sie mit "Ich habe sie kopiert".
[ 20] [ConfigUtil::answerQuestion] Throwing exception: class std::runtime_error

Hold On! German error message in Data Protector? The Virtual Center Server definitely was installed with English Locale, however, the service and user was not set to English Locale. So wondering why I translated this topic for you? The error might appear to you too, especially when not located in native English speaking countries. With the link (Thanks to Sebastian): http://kb.vmware.com/selfservice/microsites/search.do?language=en_US&cmd=displayKC&externalId=2121646 the cause was fixed very soon and PowerOn and Migrate worked as expected.

“Share presentation failed”

[Normal] From: RSM@hpcs.customer.local ""  Time: 8/10/2015 9:54:59 AM
	Restore session 2015/08/10-10 started.

[Normal] From: RMA@hpcs.customer.local "SmartCache_gw1 [GW 18252:0:17740599057275740933]"  Time: 8/10/2015 9:55:38 AM
	STARTING Media Agent "SmartCache_gw1 [GW 18252:0:17740599057275740933]"

[Normal] From: RMA@hpcs.customer.local "SmartCache_gw1 [GW 18252:0:17740599057275740933]"  Time: 8/10/2015 9:55:39 AM
	Loading medium from slot \\hpcs.customer.local\D:\Cache\358d640a_55d57510_0908_13a1 to device SmartCache_gw1 [GW 18252:0:17740599057275740933]

[Major] From: RMA@hpcs.customer.local "SmartCache_gw1 [GW 18252:0:17740599057275740933]"  Time: 8/10/2015 9:55:45 AM
	Share presentation failed.

[Major] From: OB2BAR_VEAgent@hpcs.customer.local "/DATACENTER"  Time: 8/10/2015 9:55:45 AM
	Received ABORT request from RSM (ERR: Error starting backup/restore (BMA cannot be started or similar).)

[Major] From: VEPALIB_VMWARE@hpcs.customer.local "/DATACENTER"  Time: 8/10/2015 9:55:45 AM
	Preparation of replica vm 'virtualmachine' for restore failed ...

[Critical] From: VEPALIB_VMWARE@hpcs.customer.local "/DATACENTER"  Time: 8/10/2015 9:55:45 AM
	Power On Virtual Machine failed.

After some debugging I found that port 111 was in use ( nestat -ano). A look at the process list for the given PID indicated the responsible process – ONC / RPC Portmapper. The process (from QLogic’s OneCommand) occupied the port 111 and thus prevented a start of the NFS service. Solution: Disable the service ONC / RPC portmapper, start NFS service, and immediately the presentation to the ESX server is working.

By the way: to purge the powered on machines the command omnidbutilwas enhanced. With command omnidbutil -purge_expired_poweron_vms -daily you can cleanup the environment.

Step by Step: Power On and Live Migrate from 3PAR Snapshots

$
0
0

After I released the article https://www.data-protector.org/wordpress/2015/08/tested-poweronrun-live-migrate-3par-snapshots-smartcache/, some of you asked for a more detailed documentation regarding “Power On and Live Migrate from 3PAR Snapshots or Smartcache”, the new features introduced in Data Protector 9.04. To use Zero Downtime Backup you can refer to the guides ZDBAdmin.pdf and ZDBIntegration.pdf. In addition in the document Integration.pdf on pages 717, 719 and 748 additional information can be found.

A documentation with screenshots for “Power On from 3PAR Snapshots” you can find here: http://www.syncer.de/?p=795. Thanks to Sebastian for the detailed documentation.

HPE Data Protector – Cross Cell Replication – step by step

How to set up Data Protector to use Smart Cache for Power On and Live Migrate

$
0
0

With HPE Data Protector you have advance VM recovery functionality when backing up using either a 3Par or Smart Cache device.

To give you some background on why this is the supported method is due to the flow/process that Data Protector uses when doing this type of recovery.

Once the restore job has been created as a Power On or Live Migrate, Data Protector will create a NFS share from the Smart Cache device and present and mount it to the ESXi server, sounds simple enough and it is since Data Protector does all of this for you. The reason your Smart Cache device cannot use NAS mount points is due to limitations of NAS in that you cannot do a double mount on a shared volume. What is a double mount you ask? When you create a NAS share (CIFS or NFS) that counts as one share, as explained above that Data Protector process is to create a NFS share to present to the ESXi server, if attempted on a NAS share that would count as the second share which is the part that is not supported.

By definition a Smart Cache is as follows:

Smart Cache:

The Smart Cache is a backup to disk device that enables non-staged recovery from VMware backups. The Smart Cache device can operate on one of the following mount points:

  • NAS share (CIFS and NFS)
  • Disk (SAN, iSCSI, local) formatted with file system

However it needs to be noted that in order to do Power on or Live Migrate the Smart Cache device can NOT use NAS share as a mount point, only SAN, iSCSI and Local disk are supported.

To get started select which server will be used as the Smart Cache client with the above mentioned storage type, set your storage up as you normally would a typical file system, create a directory on the file system.

Once that has been done you will need to run the following commands from the Powershell Admin console, this enables the server to run remotely signed executable jobs that Data Protector will run to create a NFS share from the Smart Cache device. The second command just verifies that the server is configured correctly.

Set-ExecutionPolicy remotesigned
You will be prompted to verify are you sure you want to do this, you would type “Y” for yes as in the screen shot below.
smart1

Next you will need to run the following command from the c:\Program Files\Omniback\bin directory if you are using windows. As shown in the screen shot below
.\nfsServiceCheck.ps1
smart2

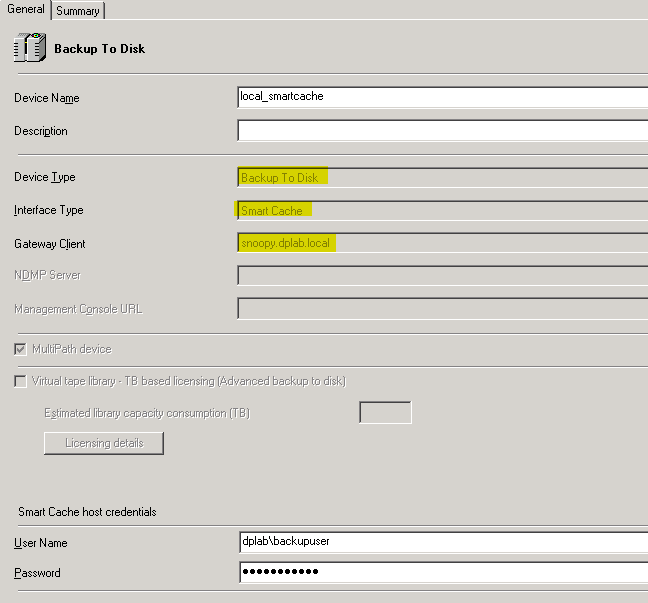
Once this has been done you just simply create a new Backup to Disk device using the client you configured above as seen in the screen shot below
smart3

Once you have the device created you simply run your VM integrated backup with this device as your target.

When you are ready to do a Power On or Live Migrate restore you will select the recovery version that used the Smart Cache device and select the Power On or Live Migrate from the VM options drop down as highlighted below.
smart4

Then you set the destination from the destination tab and hit the Power On button at the bottom as highlighted in the screen shot below
smart5

Then the restore process will begin. Just as a reminder when a Power On is the restore type selected it will power on the restored VM with networking disabled as not to interfere with the already running VM with the same name.

The restore session will look something like the screen shot below
smart6

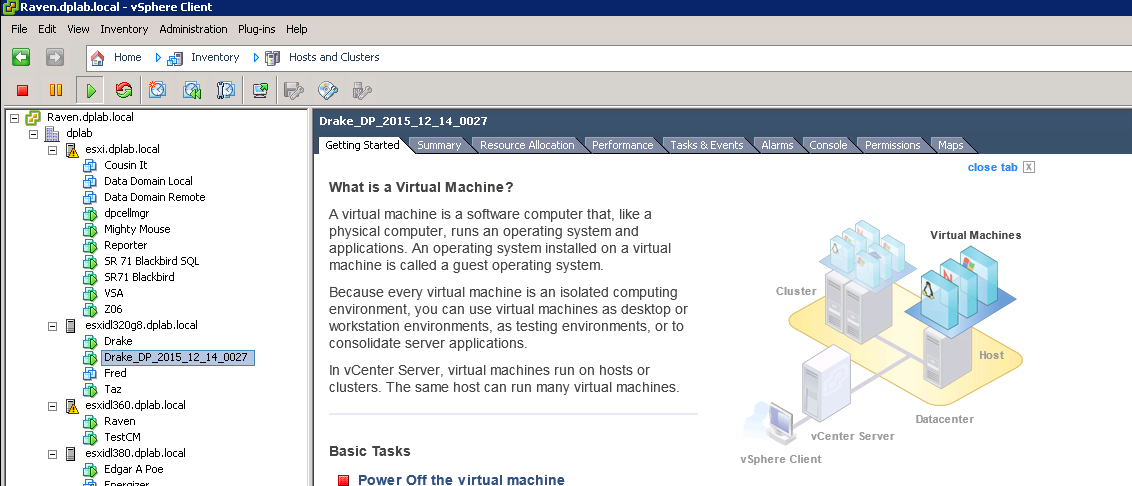
You will note on the vCenter server that it creates a new VM using the session id as part of the name, and again it is powered on with its Networking disabled.
smart7

Once you have finished your testing, Twenty-Four hours later Data Protector will automatically delete the mounted VM from the vCenter server (does not apply for live migrated machines).

This post was prepared and documented by Geoff Rennie. Geoff is a Presales colleague in HPE Software – AMS region. Thanks for sharing this content.
Data Protector GRE with VMware 6 and vCenter Server Appliance


Prepare and execute EADR – Cell Server on Windows 2012 R2 and Data Protector 9.06

$
0
0

In the past I often informed about the free EADR feature in Data Protector to recover clients and cell server. The last time I wrote an article in 2014 including two small scripts to get things prepared and automated – see https://www.data-protector.org/wordpress/2014/04/eadr-cell-server-dp-8-1x-windows-2012-r2/. However, the batch files got broken due to changes for omniiso and so it was time to fix this problem, providing new batches and delivering a complete picture of disaster recovery for Data Protector Cell Manager. Get inspired for your choice of disaster recovery; the new batches can be found at the end of this article. All content applies to Cell manager running on Windows with current Data Protector version 9.06

Preparation:

  • Plan the required steps
    • Consider which Media Agents and devices to be used in case you need to execute EADR
    • Select the desired DR method
    • Document the media where IDB (backup Cell Manager) was written to.
    • Verify you have access to the location of the required files
    • Create a step-by-step checklist
    • Create and execute EADR to verify it works in your environment and get trained for EADR on regular basis
    • Avoid disaster by implementing Cell Server in MS Cluster, MC/ServiceGuard, VMware, …
  • Get prepared
    • Run regular and consistent backups (daily IDB, daily filesystem)
    • Document important settings (TCP/IP properties, network cards and names, …)
    • Include CONFIGURATION object into filesystem backup and make sure “Automatic Disaster Recovery Component” is installed on Cell Server
    • Store important files in a safe place (SRD, obrindex.dat, …)

DR methods:

  • AMDR – Assisted Manual Disaster Recovery
    • For DR the installation of a disaster recovery operating system is required
    • The original operating system is recovered by omnir command
    • Requirements
      • Disks of same or bigger size
      • Type of filesystem and attributes of the new volumes must match
      • Hardware and hardware configuration of new system must be the same as original
  • OBDR – One Button Disaster Recovery
    • All required information to recover are collected during backup
    • OBDR device (emulating CD-ROM) used to boot directly from tape
    • System is recovered with DP as it was at the time of backup
    • Not available to recover Windows Cell Manager
    • Requirements
      • Tape device must support boot option
      • Hardware and hardware configuration of new system must be the same as original
      • Disks of same or bigger size
  • EADR – Enhanced Automated Disaster Recovery
    • Preferred method to recover Data Protector Cell Managers and clients
    • Preferred method to recover Data Protector Cell Managers and clients that are part of Microsoft Cluster Server
    • Requirements
      • Prepare recovery CD, USB stick or network bootable image in advance and before disaster occurs
      • Prepare removeable media containing encryption keys
      • Disks of same or bigger size
      • IDB backup must be newer than filesystem backup of Cell Manager

For any additional information you may refer to the “Disaster Recovery Guide”. The EADR – Enhanced Automated Disaster Recovery is the preferred method (and my favorite) to recover a cell server.

Support:

  • EADR support
    • Windows 2008 (x86/x64) – requires WAIK (Windows Automated Installation Kit) – Windows Vista/Windows Server 2008
    • Windows 2008 R2 (x64) – requires WAIK (Windows Automated Installation Kit) – Windows 7/Windows Server 2008 R2
    • Windows 2012 (x64) – requires ADK (Windows Assessment and Deployment Kit) – Windows 8/Windows Server 2012. Supports dynamic disks
    • Windows 2012 R2 (x64) – requires ADK (Windows Assessment and Deployment Kit) – Windows 8.1/Windows Server 2012 R2. Supports dynamic disks
  • Additional information
    • OBDR on Windows supported for clients only
    • OBDR / EADR on Linux supported for clients and Cell Managers
    • On Windows and for EADR EGI/UEFI and GPT partitions are supported
    • DR ISO’s for Linux systems must be created on Linux systems
    • Comments for Cluster configurations
      • Cell Server on Windows – manual or EADR
      • Cell Server on Linux Cluster – MC/ServiceGuard < 11.20.20, RHEL Cluster Suite and SLES HA Cluster only as client
  • For a complete list and additional restrictions refer to “HPE Data Protector 9.0x Disaster Recovery Support Matrix”
  • Information in this document based on DP 9.06

You need to have the corresponding version of WAIK/ADK installed on your cell server. If you need to prepare for other Windows versions (normal Data Protector clients) as well, you need to install the specific WAIK/ADK version on separate Windows server (small virtual machine sufficient). For the installation of the ADK, installation of Deployment Tools and Windows PE are required only.

Preparing EADR on Cell Manager:

  • Prerequisites
    • Have the Disaster Recovery Component installed on the Cell Manager
    • Have the correct ADK (Windows Assessment and Deployment Kit) installed – Windows 8.1/Windows Server 2012 R2 (Deployment Tools + Windows PE required)
    • Have sufficient disk space available
    • Automount
      • Enabled – required for System Reserve partition
      • Disabled – mount System Reserve partition (drive letter)
    • The operating system must be activated (otherwise DR may fail)
    • Do not select backup object versions which belong to checkpoint restart backup sessions (resume sessions)
    • The required scripts are stored in OMNIBIN folder, in most cases C:\Program Files\OmniBack\bin\
  • Create a filesystem backup specification including boot partition, DP installation volume, CONFIGURATION object. Adjust different settings like backup targets, schedule, etc.
  • Define the Post-exec script “EADR_CS_FSBackup_Post.cmd”
  • The disaster recovery image is saved to the Cell Manager during backup (P1S files and ClientName.img). Setting this option is much faster from the disk than from a backup medium, and is required here to automate stuff.
  • Configure WinFS Options and when all settings configured safe the specification.
  • Create the IDB backup specification
  • Define the Post-exec script “EADR_CS_IDBBackup_Post.cmd”

The backup and the scripts:

  • Filesystem backup specification for the cell server is executed, at the end post-exec stores information about session ID to file and executes the IDB backup.
  • Script – EADR_CS_FSBackup_Post.cmd:
  • SET OMNIHOME=C:\Program Files\Omniback
    SET OMNIDATA=C:\Programdata\Omniback
    SET IDBBACKUP=CellServerIDB
    SET FS_SESSION_FILE=EADR_CS_FSBackup_SESSIONID.txt
    echo %SESSIONID% > "%OMNIDATA%\tmp\%FS_SESSION_FILE%"
    "%OMNIHOME%\bin\omnib.exe" -idb_list "%IDBBACKUP%" -barmode full -no_monitor
    		
  • Backup specification for IDB is executed, at the end post-exec creates ISO image.
  • In some cases the session might get marked completed and some session messages will not appear.
  • Script EADR_CS_IDBBackup_Post.cmd:
  • SET OMNIHOME=C:\Program Files\Omniback
    SET OMNIDATA=C:\Programdata\Omniback
    SET OMNIISOCOMMAND="%OMNIHOME%\bin\omniiso.exe"
    SET CELLSERVER=w2012r2dpcs.localdomain
    SET ISOPATH=%OMNIDATA%\tmp\
    SET ADKPATH=C:\Program Files (x86)\Windows Kits\8.1\
    SET MEDIAFILE_CS=usedmedia_IDB_CS.txt
    SET MEDIAFILE_FS=usedmedia_IDB_FS.txt
    SET SRDFILE=%OMNIDATA%\Config\Server\dr\srd\%CELLSERVER%
    SET P1SFILE=%OMNIDATA%\Config\Server\dr\p1s\%CELLSERVER%
    SET P1SIMAGE=%OMNIDATA%\Config\Server\dr\p1s\%CELLSERVER%.img
    SET /p "FS_SESSIONID="< "%OMNIDATA%\tmp\EADR_CS_FSBackup_SESSIONID.txt"
    SET IDB_SESSIONID=%SESSIONID%
    SET NETWORKSHARE=\\192.168.253.141\dr
    if exist "%ISOPATH%%CELLSERVER%.iso" (del /Q "%ISOPATH%%CELLSERVER%.iso")
    "%OMNIHOME%\bin\omnisrdupdate" -session %FS_SESSIONID% %IDB_SESSIONID% -location "%NETWORKSHARE%" -anyobj
    %OMNIISOCOMMAND% -session %FS_SESSIONID% %IDB_SESSIONID% -cd -anyobj -out "%ISOPATH%%CELLSERVER%.iso" -srd "%NETWORKSHARE%\recovery.srd" -rset "%P1SFILE%" "%P1SIMAGE%" -autoinject
    "%OMNIHOME%\bin\omnidb.exe" -session %SESSIONID% -media > "%ISOPATH%%MEDIAFILE_CS%"
    "%OMNIHOME%\bin\omnidb.exe" -session %SESSIONID% -media -detail >> "%ISOPATH%%MEDIAFILE_CS%"
    "%OMNIHOME%\bin\omnidb.exe" -session %FS_SESSIONID% -media > "%ISOPATH%%MEDIAFILE_FS%"
    "%OMNIHOME%\bin\omnidb.exe" -session %FS_SESSIONID% -media -detail >> "%ISOPATH%%MEDIAFILE_FS%"
    if exist "%ISOPATH%%CELLSERVER%.iso" (
    	copy "%ISOPATH%%CELLSERVER%.iso" "%NETWORKSHARE%" /Y
    	copy "%ISOPATH%%MEDIAFILE_CS%" "%NETWORKSHARE%" /Y
    	copy "%ISOPATH%%MEDIAFILE_FS%" "%NETWORKSHARE%" /Y
    )
    exit
    		

EADR at work:

  • For the example VMware workstation was used to recover the cell server. The ISO was mounted to the VM and in EFI Boot Manager use CDROM was selected.
  • The virtual machine starts from CDROM – DR ISO image
  • The system is prepared for the restore, network is initialized and information regarding hardware and DR read from minios
  • Select recovery scope and press finish
  • The process continues
  • The DR wizard is started
  • Data Protector client is installed
  • Restore process has been started
  • The Offline Restore begins
  • The IDB is restored at the end and after all filesystem objects, DR process is finished
  • Some post tasks are executed and the system is ready to reboot
  • After the recovered server has been started, verfiy IDB is consistent

Devices:
The EADR process demonstrated in this article was tested and verified for Windows 2012 R2 Cell Server using Filelibrary running on different host. Supported device and media agent combinations

  • Filelibray on different server (media agent)
  • StoreOnce Software Store on different server (media agent)
  • StoreOnce
  • Local attached tape devices
  • Local attached tape libraries (you may load the media manually using uma command)
  • Tape devices on different server (media agent)
  • Tape libraries on different server (media agent)

Donwload:

EADR for Cell Server – DP 9.06 on Windows 2012 R2

Script to distribute omnirc file

$
0
0

Since Data Protector 8.11 version it is possible to distribute omnirc parameter for the Data Protector clients using a command. In a former article I informed about – please refer to https://www.data-protector.org/wordpress/2014/05/distribute-omnirc-file/. Using omnirc settings you can control the client behavior and is important from performance point of view too. With the Data Protector default settings the omnirc file is not present and usually has to be created from the template file. To prevent manual work, either by copying the file or using the command util_cmd, Sebastian Köhler (http://www.syncer.de) wrote a Perl script automating all the stuff. Kudos to Sebastian! The script can be found at the end of the article or in download section.

The script is very handy and easy to use – see screenshot.
omnircsync

The settings can be distributed to all clients, clients with selected operating system, or clients with selected Data Protector modules. The script either works interactive or non-interactive and requires an ASCII formatted template file with the parameter you want to apply.

c:\>perl omnircsync.pl omnirc -os microsoft
-------------------------------------------------------------------------------
Clients that will receive parameters from omnirc template:
-------------------------------------------------------------------------------
[X] sqldemo
[ ] ubuntuvm.localdomain
[X] w2012r2dp.localdomain
-------------------------------------------------------------------------------

-------------------------------------------------------------------------------
Parameter found in omnirc template:
-------------------------------------------------------------------------------
OB2DEVMUTEXTIMEOUT=12000
OB2FILELIBDISKFULL=1
OB2FWPASSTHRU=1
OB2INETTIMEOUT=10
...
OB2NOREMOTEWARNINGS=1
OB2NOTREEWALK=1
OB2_SSH_ENABLED=1
-------------------------------------------------------------------------------

INTERACTIVE mode: enabled

Please confirm push operation to 2 clients? (Y/N) y

-------------------------------------------------------------------------------
Synchronization of omnirc started:
-------------------------------------------------------------------------------
=> sqldemo: [DONE]
=> w2012r2dp.localdomain: [DONE]
-------------------------------------------------------------------------------

Download:
omnircsync.zip

OMNIOFFLR – Offline Restore Data Protector Internal Database

$
0
0

In one of my previous articles I briefy informed about EADR for Data Protector 9.06 on Windows 2012 R2 – please refer to https://www.data-protector.org/wordpress/2016/05/prepare-and-execute-eadr-cell-server-on-windows-2012-r2-data-protector-9-06/.

However, if you don’t need EADR as a complete recovery option and the preparation for disaster recovery for the IDB is required only, then you can use the regular backup of the internal database. A standard restore requires a working internal database and this might be a problem for some environments. There is a more efficient method to recover the IDB, using the command omniofflr. The content of this article was verified for a Cell Manager on Windows 2012 R2 and Data Protector 9.06.

Offline Restore – how it works:

  • Enables restore of any type of DP backup objects in the absence of operable Data Protector internal database, including IDB itself
  • Can also be used indirectly by the higher-level omnidr command, which automatically generates appropriate omniofflr command-line options, based on the information retrieved from the SRD file
  • Omniofflr command might be used to „just“ recover the internal database
  • To execute omniofflr command you need to specify the details about backup and restore devices and the backup media – information about these details is stored in SRD file or obrindex.dat; can also be specified in the command-line
  • Phases of omniofflr
    • DP services stopped (except for Data Protector Inet service)
    • IDB restore
    • Rollforward operation on the IDB using transactions from the available archived logs
    • Starting DP services

Omniofflr modes:

  • Autorecovery mode
    • Omniofflr operation is fully automated, all required information is retrieved from obrindex.dat
    • Obrindex.dat updated during each IDB backup
    • Maintain a copy by using RecoveryIndexDir in global option file
    • Omniofflr can use the copy in case orginial file is missing
  • Read mode
    • Omniofflr retrieves information from an option file
    • Option file can be generated using -idb -autorecover -save
    • Allows modification of devices (in case media agent resides on different system)
  • Manual mode
    • In case obrindex.dat and option file are not available, specify all required parameter in command line

To make the process automated and prepared in advance, you can use a post-exec script during the IDB backup. Script:

SET IDB_SESSIONID=%SESSIONID%
copy "C:\dr\obrindex.dat" "\\ServerMA\C$\dr\obrindex.dat"
move "\\ServerMA\C$\dr\idbrestore_omniofflr.txt" "\\ServerMA\C$\dr\idbrestore_omniofflr_old.txt"
"C:\Program Files\OmniBack\bin\omniofflr" -idb -autorecover -session %IDB_SESSIONID% -skiprestore -save "\\ServerMA\C$\dr\idbrestore_omniofflr.txt"
exit

Assumption used for this example: Cell Server – ServerCS, Media Agent – ServerMA, copy of obrindex.dat – c:\dr\obrindex.dat (see global option file)
offlr2

To start the restore of IDB use the syntax:

omniofflr -idb -read „\\ServerMA\C$\dr\idbrestore_omniofflr.txt” -verbose -target ServerCS

offlr3

RUNBOOK – Migrate Data Protector 7.0x to Data Protector 9.0x

$
0
0

Update 2016/0705: In section installation source it was recommended to use a patched installation source for the upgrade. This method must not be used for upgrades from Data Protector versionen 8.13 and newer, as it will cause serious damages in the internal database (no fix available/possible). For versions older 8.13 it is too recommended not to use a patched installation source due to missing tests by engineering. In this case, please install Data Protector 9.0 first followed by installation of current patch bundle. One exception to use a patched installation source is when doing a new installation (“green field approach” – i.e. Windows 2012 R2 Cluster Cell Server), es there are no depenencies for upgrading internal database.

Data Protector 7.0 was introduced on 16.04.2012 and meanwhile superseded by two major releases. On 30.06.2016 the time has come and the support for Data Protector 7.0x ends. Thus, it is time for all undecided customer to upgrade to the current version – Data Protector 9.06. A big step, as with the upgrade the internal database will change. Many customers have been postponed this step due to uncertainties with the upgrade. Hewlett Packard Enterprise already released in the past two advisories and explained how the upgrade to the new internal database can be performed (please refer to http://h20564.www2.hpe.com/hpsc/doc/public/display?docId=c04350769 and http://h20566.www2.hpe.com/hpsc/doc/public/display?docId=c04937621). However, the change to the new version also offers opportunities, the backup and recovery strategy (e.g. backup to HPE StoreOnce) might be reconsidered, as the current version offers a lot of new features compared to Data Protector 7.0x. Some selected features:

  • 3PAR Remote Copy support
  • Automated pause and resume of backup jobs
  • Accelerated VMware backup through 3PAR snapshot management
  • Cached VMware single item recovery direct from HPE 3PAR snapshot or Smart Cache
  • VMware Power On and Live Migrate from HPE 3PAR snapshot or Smart Cache
  • StoreOnce Catalyst over Fiber Channel and Federated Catalyst support
  • Data Domain appliance to appliance replication management
  • Automated Replication Synchronization – synchronize metadata of replicated objects between Cell Manager

On the web there are many instructions, but no step-by-step documentation for upgrading to latest version. Therefore, this article deals with the upgrade of Data Protector 7.0x to Data Protector 9.06 and offers all required steps as a runbook.

Some notes before you can start:

  • This step-by-step documentation is valid for Cell Manager Installation on Windows 2008 or Windows 2012. It is assumed that the path C:\Program Files\OmniBack and C:\ProgramData\OmniBack is used. This runbook can also be used for Linux or deviating installation paths.
  • When migrating (this is a separate and subsequent process) the DCBF files are converted into a new format. The new DCBF format is approximately 1.5 times to 2 times larger than the old format, it is therefore enough free disk space required.
  • All existing Data Protector licenses should be regenerated in advance using the new licensing portal https://myenterpriselicense.hpe.com, old OVKEY3 licenses can no longer be used in current Data Protector versions. Of course you can only be migrate licenses, for which there is a maintenance contract.
  • Should the upgrade fail despite these detailed instructions, there is always a rollback to Data Protector 7.0x possible. But you need to have your DP 7.0 installation sources and the most recently installed patch bundle available.
  • It is recommended to move all used and appendable media into a separate pool so that mixing of to be migrated and new media is avoided.
  • The Catalog Migration of DCBF files is a downstream process and can either be performed directly after the upgrade or after a few weeks. If possible plan for no activity on the Cell Server during the catalog migration.
  • It is recommended to test the upgrade using a virtual machine. Using the exported Data Protector 7 database it can be easily imported into the test environment.
  • With Data Protector 9.0x name resolution is top most priority to avoid problems during or after the migration. It is therefore required that the Cell Manager is always been resolved (FQDN, short and reverse).
  • By upgrading to the latest version earlier operating system versions may stop working, as e.g. Windows 2003 is no longer supported. In such a case and if the client is running as a virtual machine, the client can be backed up with the VMware or Hyper-V integration in the future.
  • The following steps are only one possible path for migration, there are several ways to upgrade. Thus the success is not guaranteed, because a successful upgrade also depends on the existing environment. This runbook were however already carried out during many successful migrations and thus the instructions should be appropriate for your environment too.

Preparation:

  • Checking the consistency of the internal database. There must be no errors appear. If errors are seen you need to address them before the upgrade to DP 9.0x can be continued. To check the IDB use the command:
    • omnidbcheck -extended
  • Cleaning of the old internal database:
    • Close Data Protector GUI
    • omnidbutil -clear
    • omnidb -strip
    • omnidbutil -purge -sessions 90 (or correspondingly higher, lower value)
    • omnidbutil -purge -dcbf -force
    • omnitrig -stop
    • omnistat (no backup job must run)
    • omnidbutil -purge -filenames -force
    • Open Data Protector GUI
      • Monitor -> Current Sessions
      • Select the purge session
      • Watch progress and wait for the end of the process
  • During the purge of filenames no backups can run, scheduled jobs are queued and will only be executed if the purge has been completed. In larger environments, it may be necessary to cancel the purge process and continue at a later time. To stop the purge use the command omnidbutil -purge_stop. Alternatively, the purge can also be performed selectively for individual clients.
  • Create directories for the migration:
    • mkdir C:\migration\mmdb
    • mkdir C:\migration\cdb
    • mkdir C:\migration\other
    • mkdir C:\migration\program files\omniback
    • mkdir C:\migration\program data\omniback
  • Defrag the internal database using export and import
    • It must not run any backups, check with the command omnistat
    • omnidbutil -writedb -mmdb C:\migration\mmdb -cdb C:\migration\cdb
    • At the end of the export you are prompted to copy some special directories. You need to copy them before the database is re-enabled. These are usually the DCBF and MSG directories, but there might be other directories required to copy. For safety the following directories are copied:
      • robocopy "C:\ProgramData\OmniBack\DB40\DCBF" C:\migration\other\DCBF *.* /e /r:1 /w:1
      • Copying may be necessary for further DCBF directories. In this case, the copy operation is continued in line.
      • robocopy "C:\ProgramData\OmniBack\DB40\msg" C:\migration\other\msg *.* /e /r:1 /w:1
      • robocopy "C:\ProgramData\OmniBack\DB40\meta" C:\migration\other\meta *.* /e /r:1 /w:1
      • robocopy "C:\ProgramData\OmniBack\DB40\vssdb" C:\migration\other\vssdb *.* /e /r:1 /w:1
    • Now the exported database can be imported again, the following command is used:
      • omnidbutil -readdb -mmdb C:\migration\mmdb -cdb C:\migration cdb
    • If the command omnidbinit -force was used prior importing the database the DCBF, MSG and META directories need to be copied back into the old location, because the original folders are deleted when the database is initialized. For this, however, the Data Protector services must be stopped. If necessary, additional DCBF directories for the internal database must be created beforehand.
  • For safety, the omnidbcheck -extended is performed again, it must not show any errors.
  • If necessary, temporary files in C:\ProgramData\OmniBack\tmp and C:\ProgramData\OmniBack\log can be removed. But please be beware: not all log files can be deleted. Files as the media.log must be retained, because it might be required in case of recovering data. The media.log provides information when and in what order a media was used during a backup.
  • Copy/backup the entire Data Protector installation:
    • omnisv -stop
    • robocopy "C:\Program Files\OmniBack" C:\migration\programfiles\omniback *.* /e /r:1 /w:1 /purge
    • robocopy C:\ProgramData\OmniBack C:\migration\programdata\omniback *.* /e /r:1 /w:1 /purge
    • omnisv -start

Installation sources:

  • It is highly recommended to use a patched installation source for the installation. To this end, the following steps are carried out on a temporary Windows server on which no Data Protector installation exists.
  • The so updated installation can be used as an installation source for the upgrade of the Cell Manager. To this end, all the folders of the depot from the temporary installation server are copied to the Data Protector Cell Manager 7.0x (e.g. to C:\migration\install). Once done, the temporary installation server can be uninstalled.

Upgrade:

  • The upgrade is carried out with the patched installation sources and setup.exe is executed as an administrator (run as admin).
  • It is recommended to leave all the proposed defaults during installation and thus perform the upgrade.
  • During the upgrade parts of the old database are exported and prepared for import into the new database. This process may take some time depending on the size of the environment; the process should not be interrupted.
  • Following this part the installation of Data Protector 9.0x is continued normally.
  • After the upgrade it is recommended to review and adjust the configuration files global and omnirc.
  • In addition, the backup specification of the Cell Manager should be checked. During the upgrade to DP 9.06 the existing specification has been divided into an IDB and a filesystem specification.

After the upgrade:

  • After the upgrade the DCBF directories should be migrated to the new format. In principle there are two options: the immediate migration of all DCBF files or migration of the DCBF files for long-term backups only.
  • The second way is the preferred method, as you wait for the expiration of the short-term protection of the old media and thus these DCBF files will not have to be migrated. After four to six weeks you migrate only media with long-term protection.
  • Required steps for both ways:
    • Open administrative command line and change into the directory C:\Program Files\OmniBack\bin
    • Run the command: perl omnimigrate.pl -start_catalog_migration
    • The DCBF migration is very time consuming, however, runs in the background and does not have to be actively monitored.
    • After the DCBF migration is done check that all the media have been migrated. For this purpose, the command perl omnimigrate.pl -report_old_catalog is used. As a result "DCBF (0 files)" is expected. Should still files are displayed, the following steps must not be executed.
    • If new backups have already run during DCBF migration, it may happen that DCBF 2.0 files were created in the DB40\DCBF* directories.
    • The files found in DB40\DCBF* are moved to C:\ProgramData\OmniBack\server\DB80\DCBF\dcbf1-4. The files can be distributed, in principle it is not necessary to maintain a certain order.
    • To adapt the change the command omnidbutil -remap_dcdir is executed after moving the DCBF files.
    • The old DCBF directories will be removed, the following commands are used:
      • omnidbutil -remove_dcdir "C:\ProgramData\OmniBack\DB40\DCBF"
      • omnidbutil -remove_dcdir "C:\ProgramData\OmniBack\DB40\dcbf1"
      • omnidbutil -remove_dcdir "C:\ProgramData\OmniBack\DB40\dcbf2"
      • omnidbutil -remove_dcdir "C:\ProgramData\OmniBack\DB40\dcbf3"
      • omnidbutil -remove_dcdir "C:\ProgramData\OmniBack\DB40\dcbf4"
    • Depending on the size of the environment less or more DCBF directories may be present and must be removed accordingly.
    • With the command perl omnimigrate.pl -remove_old_catalog the old catalog is removed.
    • In the file C:\ProgramData\OmniBack\Config\server\options\global the variable SupportOldDCBF=0 should be set, but it can also be removed (default after upgrade is 1).
    • Now the DB40 path can be deleted – C:\ProgramData\OmniBack\DB40

Rollback:

  • If the upgrade fails, you can rollback at any time, assuming that no migration of files DCBF files began.
  • The failed Data Protector 9.0x installation needs to be removed and installation of Data Protector 7.0x and patches to be done.
  • The command omnidbutil -readdb -mmdb C:\migration\mmdb -cdb C:\migration\cdb will be used to re-import the old database.
  • Additional directories as DCBF, MSG and META, need to be copied back to the DB40 path.
  • The configuration from the previously saved Data Protecor installation (C:\migration\omniback\programdata) needs to be copied to C:\ProgramData\OmniBack\config\server so that the initial state is restored.

Script Execution with DP 9.07 – increased security

$
0
0

With the introduction of HPE Data Protector 9.07 further action has been taken in the direction of security. Performing pre- and post-exec scripts might no longer permitted after the upgrade and instead an error is displayed.

[Major] From: BSM@w2012rdp.localdomain "dbbackup"  Time: 05.07.2016 11:35:01
      Session post-exec script C:\test\startme.cmd failed. Exit code = 2.

Reason: running scripts and binaries is only permitted in the bin directory of the installation (/opt/omni/lbin – HP-UX, Linux oder Solaris; /usr/omni/bin – other UNIX systems or OMNIHOME\bin – Windows). The usage of absolute and relative paths (for example: c:\scripts\test.cmd, /home/scripts/test.sh or ../../../home/scripts/test.sh) outside of bin is no longer permitted. Likewise, executing Perl is no longer possible and can not be used as a pre- and post-exec script directly (e.g. perl.exe myscript.pl parameter1). However, it is possible to use batch files instead (e.g. startme.cmd parameter1) in which then the actual script is called. Hence the possible values have been adjusted for the corresponding omnirc variable OB2OEXECOFF0 Pre / post-exec scripts will be ran (with the restriction on the path) and 1 Pre / post-exec scripts disabled.
With these adjustments, the scripts can then run again.

[Normal] From: BSM@w2012rdp.localdomain "dbbackup"  Time: 05.07.2016 11:55:12
      The exec script "startme.cmd" has completed.
Viewing all 53 articles
Browse latest View live